> ## Documentation Index
> Fetch the complete documentation index at: https://apidocs.writesonic.com/llms.txt
> Use this file to discover all available pages before exploring further.
# Integrating With Fastly Log Streaming
> This guide walks you through the process of implementing AI Bot Analytics on your website using Fastly's realtime log streaming.
## Prerequisites
* An active Writesonic account
* A Fastly CDN Service configured for your website
* Access/permission to edit Logging Endpoints in Fastly
## Phase 1: Start in Writesonic
1. Head over to the **AI Bot Analytics** page on Writesonic and choose ‘Fastly’ as a provider
2. Click on ‘Continue’ to initialize the integration.
 3. Writesonic will generate the following information that you'll need during the Fastly configuration:
* Log Format
* Endpoint URL
* Custom Header Value
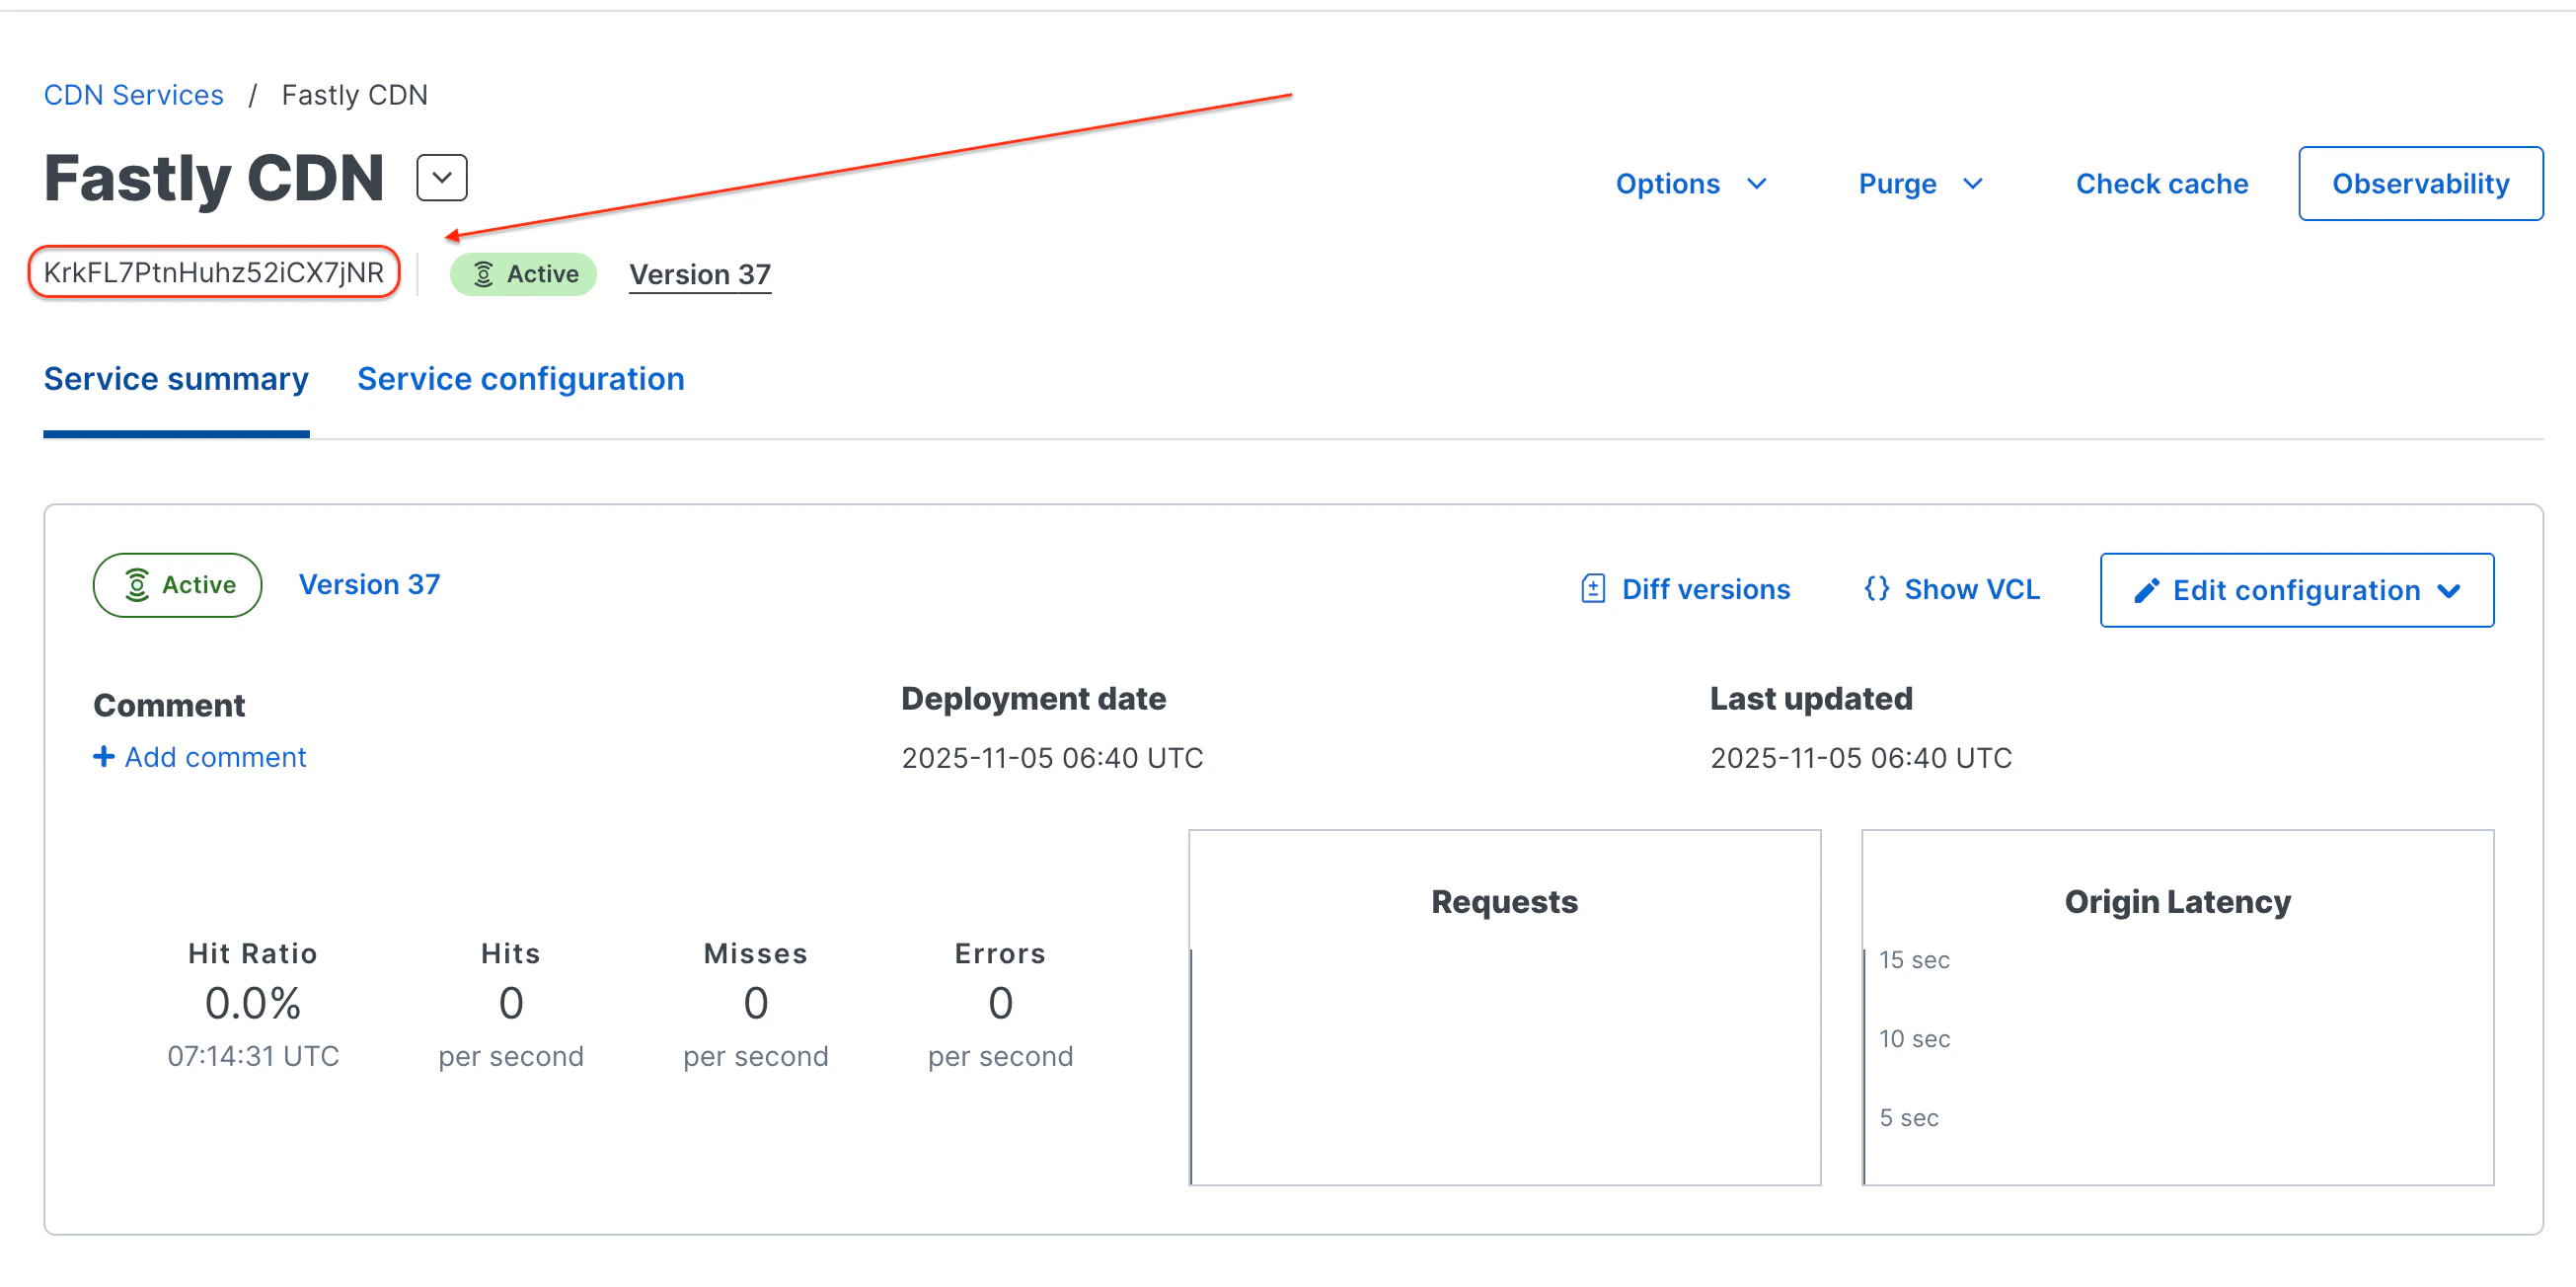
## Phase 2: Get Your Fastly Service ID
1. Log in to your Fastly dashboard
2. Navigate to your CDN Service for which you want to configure AI Bot Analytics
3. Copy the **Fastly Service ID** from your service dashboard
3. Writesonic will generate the following information that you'll need during the Fastly configuration:
* Log Format
* Endpoint URL
* Custom Header Value
## Phase 2: Get Your Fastly Service ID
1. Log in to your Fastly dashboard
2. Navigate to your CDN Service for which you want to configure AI Bot Analytics
3. Copy the **Fastly Service ID** from your service dashboard
 4. Return to Writesonic and paste the Service ID there and click “Submit”.
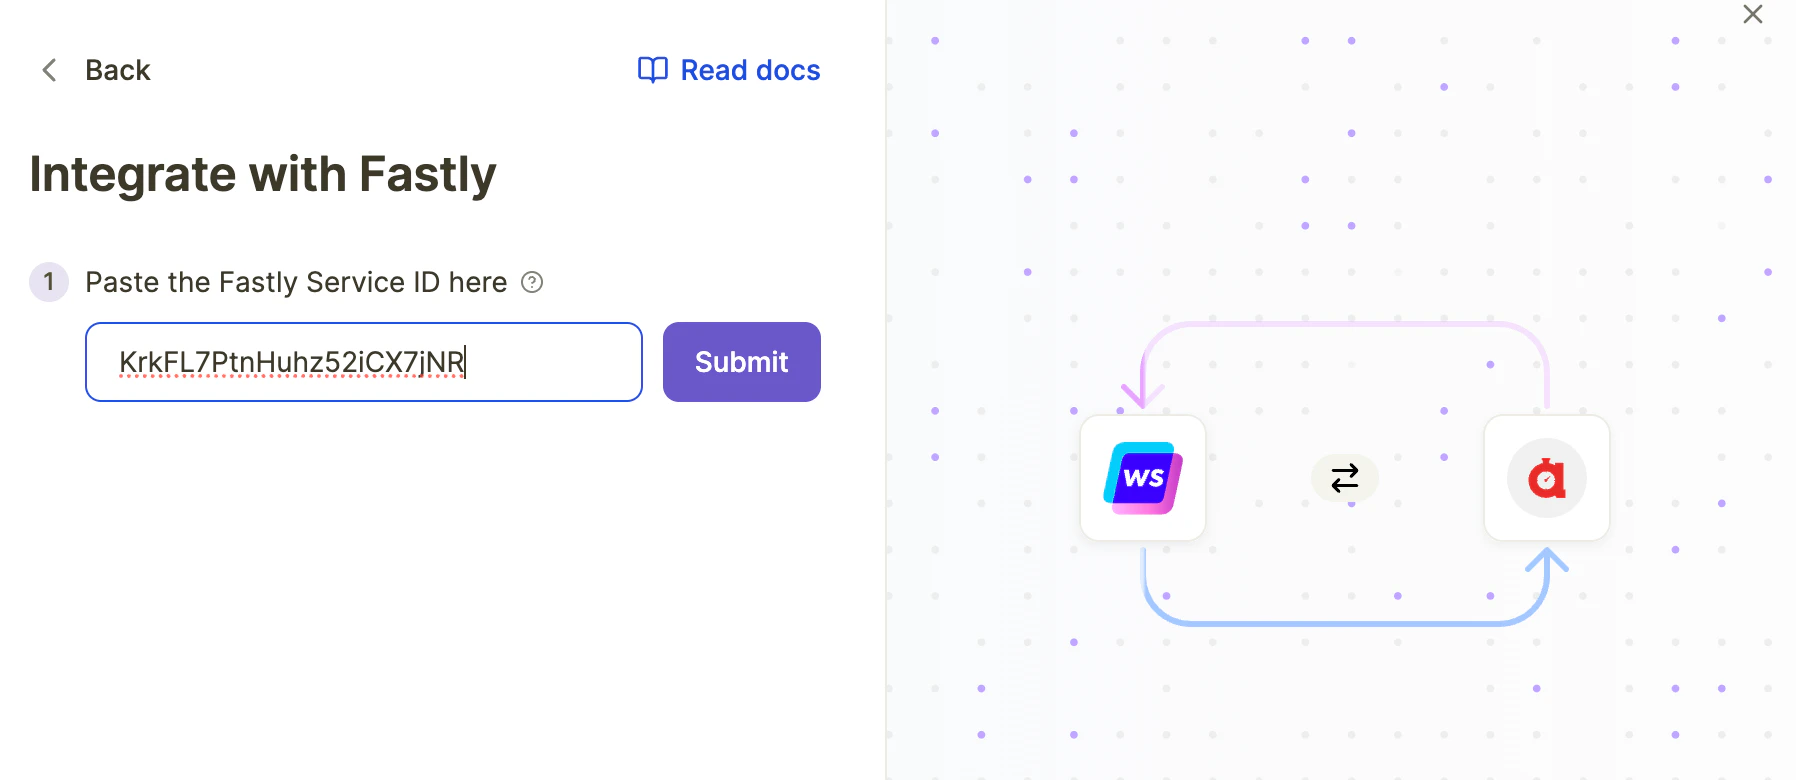 5. Click on “Continue” to proceed to the next step.
## Phase 3: Configure Logging in Fastly
### Step 1: Navigate to Logging Configuration
1. In your Fastly CDN Service, navigate to: **"Service Configuration"** > **"Logging"** > **"Create endpoint"** > **"HTTPS" > “Create endpoint”**
5. Click on “Continue” to proceed to the next step.
## Phase 3: Configure Logging in Fastly
### Step 1: Navigate to Logging Configuration
1. In your Fastly CDN Service, navigate to: **"Service Configuration"** > **"Logging"** > **"Create endpoint"** > **"HTTPS" > “Create endpoint”**
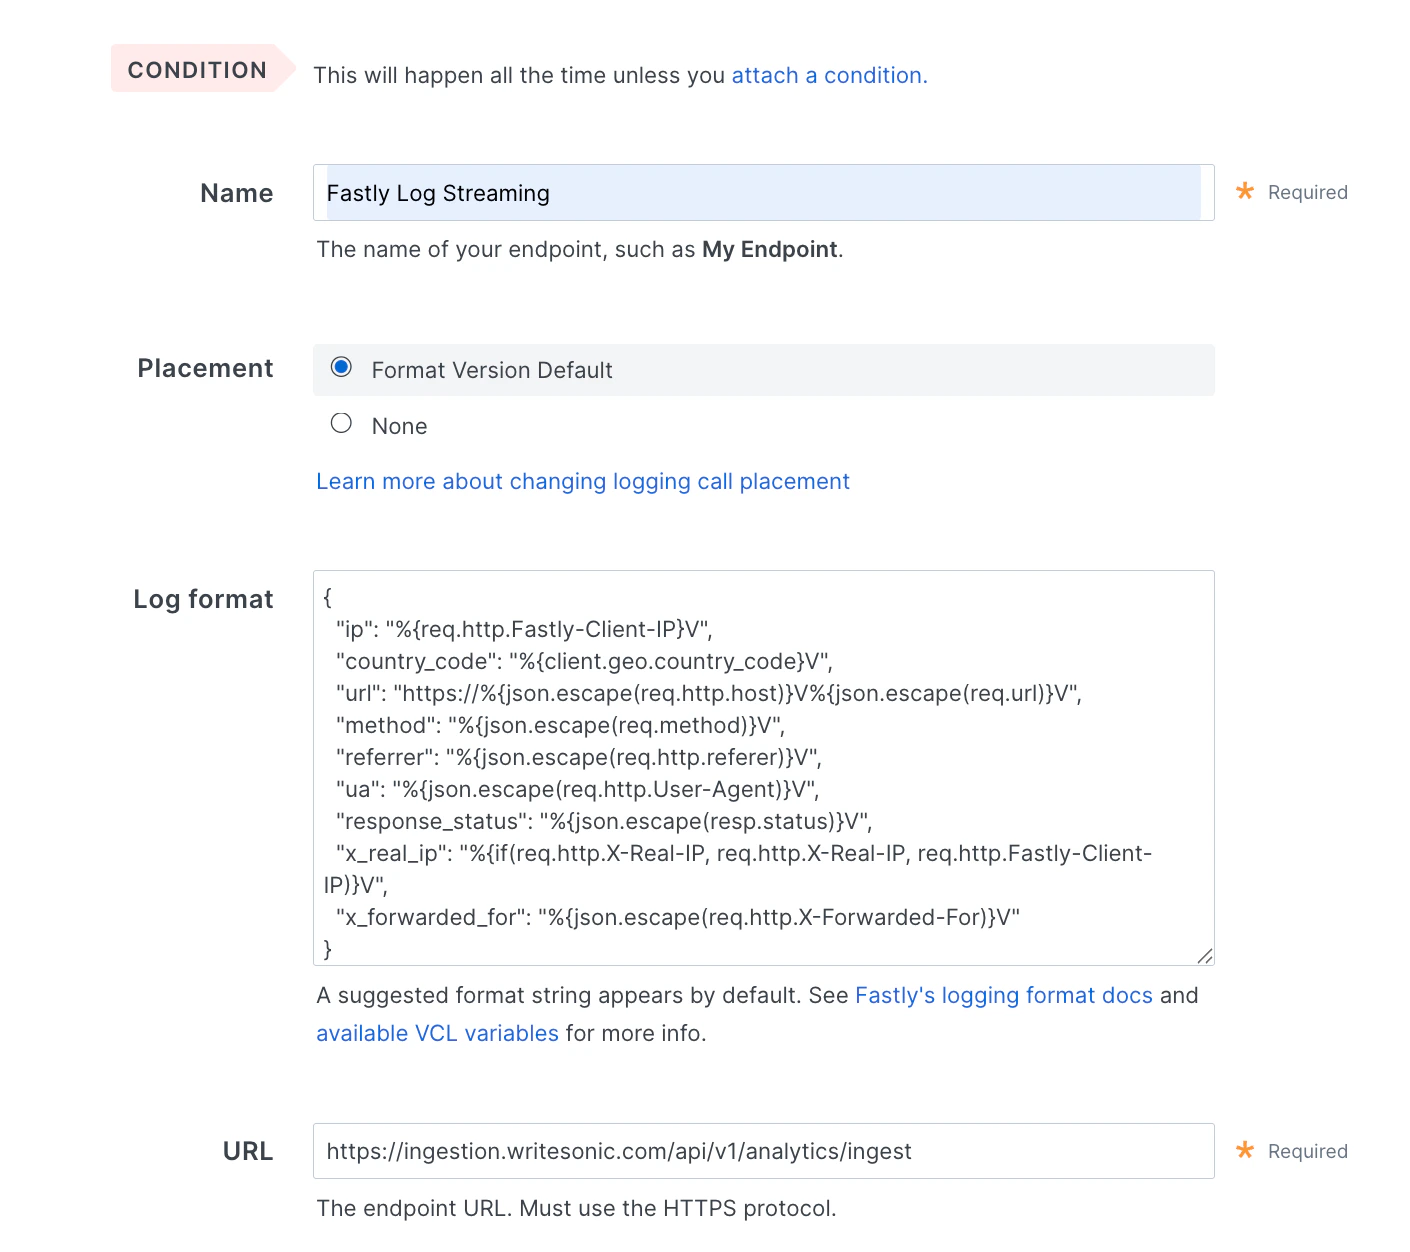
 ### Step 2: Configure the HTTPS Logging Endpoint
1. **Name**: Give a name to your logging endpoint (e.g. Fastly Log Streaming).
2. **Log Format**: Copy the Log Format from Writesonic and paste it in the ‘Log Format’ field in Fastly
3. **URL**: Copy the Endpoint URL from Writesonic and paste it in the **'URL'** field in Fastly
### Step 2: Configure the HTTPS Logging Endpoint
1. **Name**: Give a name to your logging endpoint (e.g. Fastly Log Streaming).
2. **Log Format**: Copy the Log Format from Writesonic and paste it in the ‘Log Format’ field in Fastly
3. **URL**: Copy the Endpoint URL from Writesonic and paste it in the **'URL'** field in Fastly
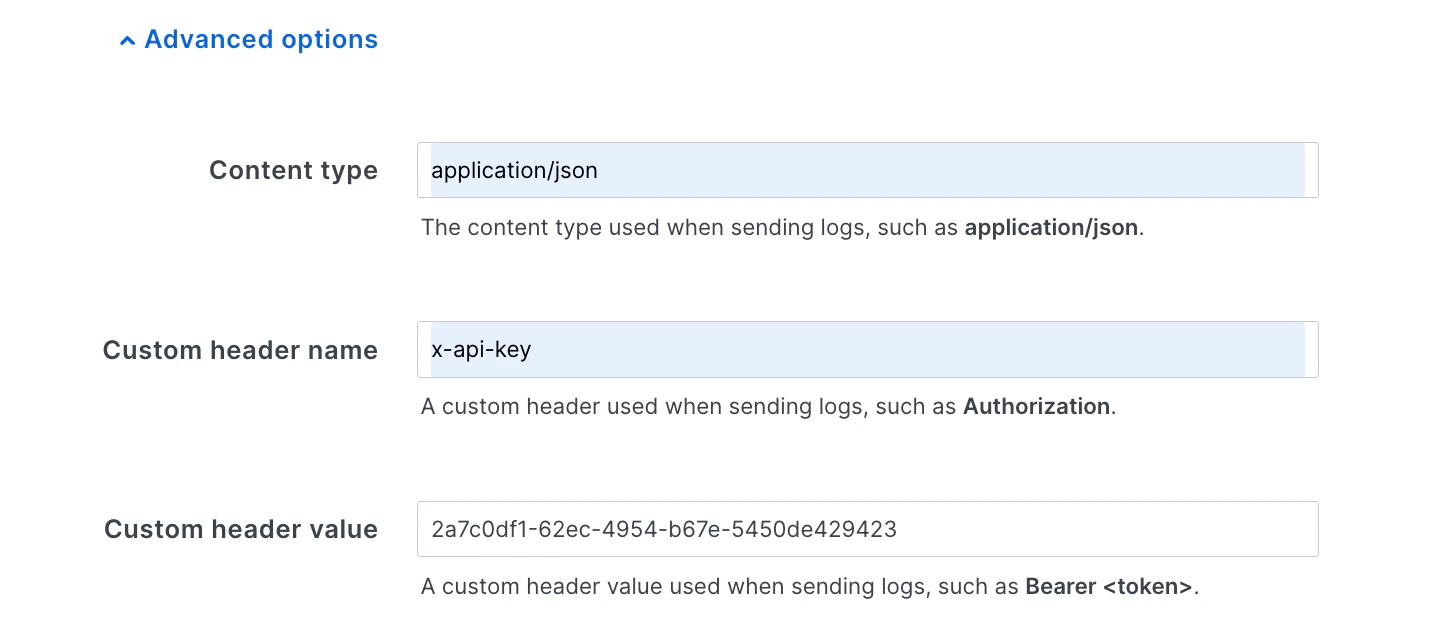
 ### Step 3: Configure Advanced Options
Navigate to **Advanced options** and set the following:
1. **Content Type**: Set to `application/json`
2. **Custom Header Key**: Set to `x-api-key`
3. **Custom Header Value**: Copy the value from Writesonic and paste it there
### Step 3: Configure Advanced Options
Navigate to **Advanced options** and set the following:
1. **Content Type**: Set to `application/json`
2. **Custom Header Key**: Set to `x-api-key`
3. **Custom Header Value**: Copy the value from Writesonic and paste it there
 > Rest of the fields in the configuration are optional and can be left as such
### Step 4: Create and Activate
1. Click **'Create'** and wait for the configuration to be applied
2. Once the configuration is ready, click **'Activate'** to finalize the setup
## Phase 4: Verify Installation in Writesonic
1. Wait for 5-10 minutes for Logging Endpoint to activate.
2. Return to AI Bot Analytics Page in Writesonic.
3. Click on **"Verify Integration"** to confirm that your Fastly integration is working properly
4. Once verified, you'll be redirected to your analytics dashboard. The process typically finishes in 1–2 minutes but may take up to 5 minutes.
## Understanding the Integration
This integration works by:
1. **Traffic Capture**: Fastly captures all incoming requests to your website
2. **Log Formatting**: The custom log format extracts relevant information about AI crawler requests
3. **Real-time Streaming**: Logs are streamed in real-time to Writesonic's analytics endpoint
4. **AI Detection**: Writesonic processes the logs to identify and analyze AI Bot traffic
## Troubleshooting
If you encounter any issues during setup:
* **Service ID Issues**: Ensure you've copied the correct Fastly Service ID
* **Configuration Problems**: Verify that the log format, endpoint URL, and headers are copied exactly as provided
* **Activation Delays**: Allow a few minutes for Fastly configuration changes to propagate
* **Missing Data**: Check that your website is receiving traffic and that the logging endpoint is properly configured
* **Header Authentication**: Confirm that the `x-api-key` header value matches exactly what Writesonic provided
* Make sure to ‘Activate’ the logging configuration after it’s been created/updated.
For assistance, contact [\[email protected\]](/cdn-cgi/l/email-protection#16656366667964625661647f62736579787f753875797b)
## Managing the Integration
### Modifying the Configuration
To modify your Fastly logging configuration:
1. Navigate back to **Service Configuration > Logging > Edit Configuration**
2. Find your Writesonic endpoint
3. Update the logging configuration and click ‘Update’
4. Don't forget to **"Activate"** your changes
***
[Integrating with Drupal](/docs/integrating-with-drupal)
[Integrating with Custom Log Drain](/docs/integrating-with-custom-log-drain)
> Rest of the fields in the configuration are optional and can be left as such
### Step 4: Create and Activate
1. Click **'Create'** and wait for the configuration to be applied
2. Once the configuration is ready, click **'Activate'** to finalize the setup
## Phase 4: Verify Installation in Writesonic
1. Wait for 5-10 minutes for Logging Endpoint to activate.
2. Return to AI Bot Analytics Page in Writesonic.
3. Click on **"Verify Integration"** to confirm that your Fastly integration is working properly
4. Once verified, you'll be redirected to your analytics dashboard. The process typically finishes in 1–2 minutes but may take up to 5 minutes.
## Understanding the Integration
This integration works by:
1. **Traffic Capture**: Fastly captures all incoming requests to your website
2. **Log Formatting**: The custom log format extracts relevant information about AI crawler requests
3. **Real-time Streaming**: Logs are streamed in real-time to Writesonic's analytics endpoint
4. **AI Detection**: Writesonic processes the logs to identify and analyze AI Bot traffic
## Troubleshooting
If you encounter any issues during setup:
* **Service ID Issues**: Ensure you've copied the correct Fastly Service ID
* **Configuration Problems**: Verify that the log format, endpoint URL, and headers are copied exactly as provided
* **Activation Delays**: Allow a few minutes for Fastly configuration changes to propagate
* **Missing Data**: Check that your website is receiving traffic and that the logging endpoint is properly configured
* **Header Authentication**: Confirm that the `x-api-key` header value matches exactly what Writesonic provided
* Make sure to ‘Activate’ the logging configuration after it’s been created/updated.
For assistance, contact [\[email protected\]](/cdn-cgi/l/email-protection#16656366667964625661647f62736579787f753875797b)
## Managing the Integration
### Modifying the Configuration
To modify your Fastly logging configuration:
1. Navigate back to **Service Configuration > Logging > Edit Configuration**
2. Find your Writesonic endpoint
3. Update the logging configuration and click ‘Update’
4. Don't forget to **"Activate"** your changes
***
[Integrating with Drupal](/docs/integrating-with-drupal)
[Integrating with Custom Log Drain](/docs/integrating-with-custom-log-drain)