> ## Documentation Index
> Fetch the complete documentation index at: https://apidocs.writesonic.com/llms.txt
> Use this file to discover all available pages before exploring further.
# Integrating with Cloudfront
> This guide walks you through the process of implementing AI Bot Analytics on your Cloudfront website using AWS CloudFormation stack.
## Prerequisites
* An active Writesonic account
* An existing AWS CloudFront distribution
* AWS Account with permissions to:
* Create CloudFormation stacks
* Modify CloudFront distributions
* Create IAM roles and policies
* Create S3 buckets and Kinesis streams
## Phase 1: Start in Writesonic
1. Head over to the AI Bot Analytics page on Writesonic and choose 'Cloudfront' as a provider
2. Click on 'Continue' to initialize the integration
3. Writesonic will provide you the following information that you'll need during the AWS configuration:
* CloudFormation Template File
* Writesonic API Key
## Phase 2: Create CloudFormation Stack
### Step 1: Access CloudFormation Service
1. Log in to your AWS Management Console
2. Navigate to the CloudFormation service
3. Click on **"Create stack"** to begin the stack creation process
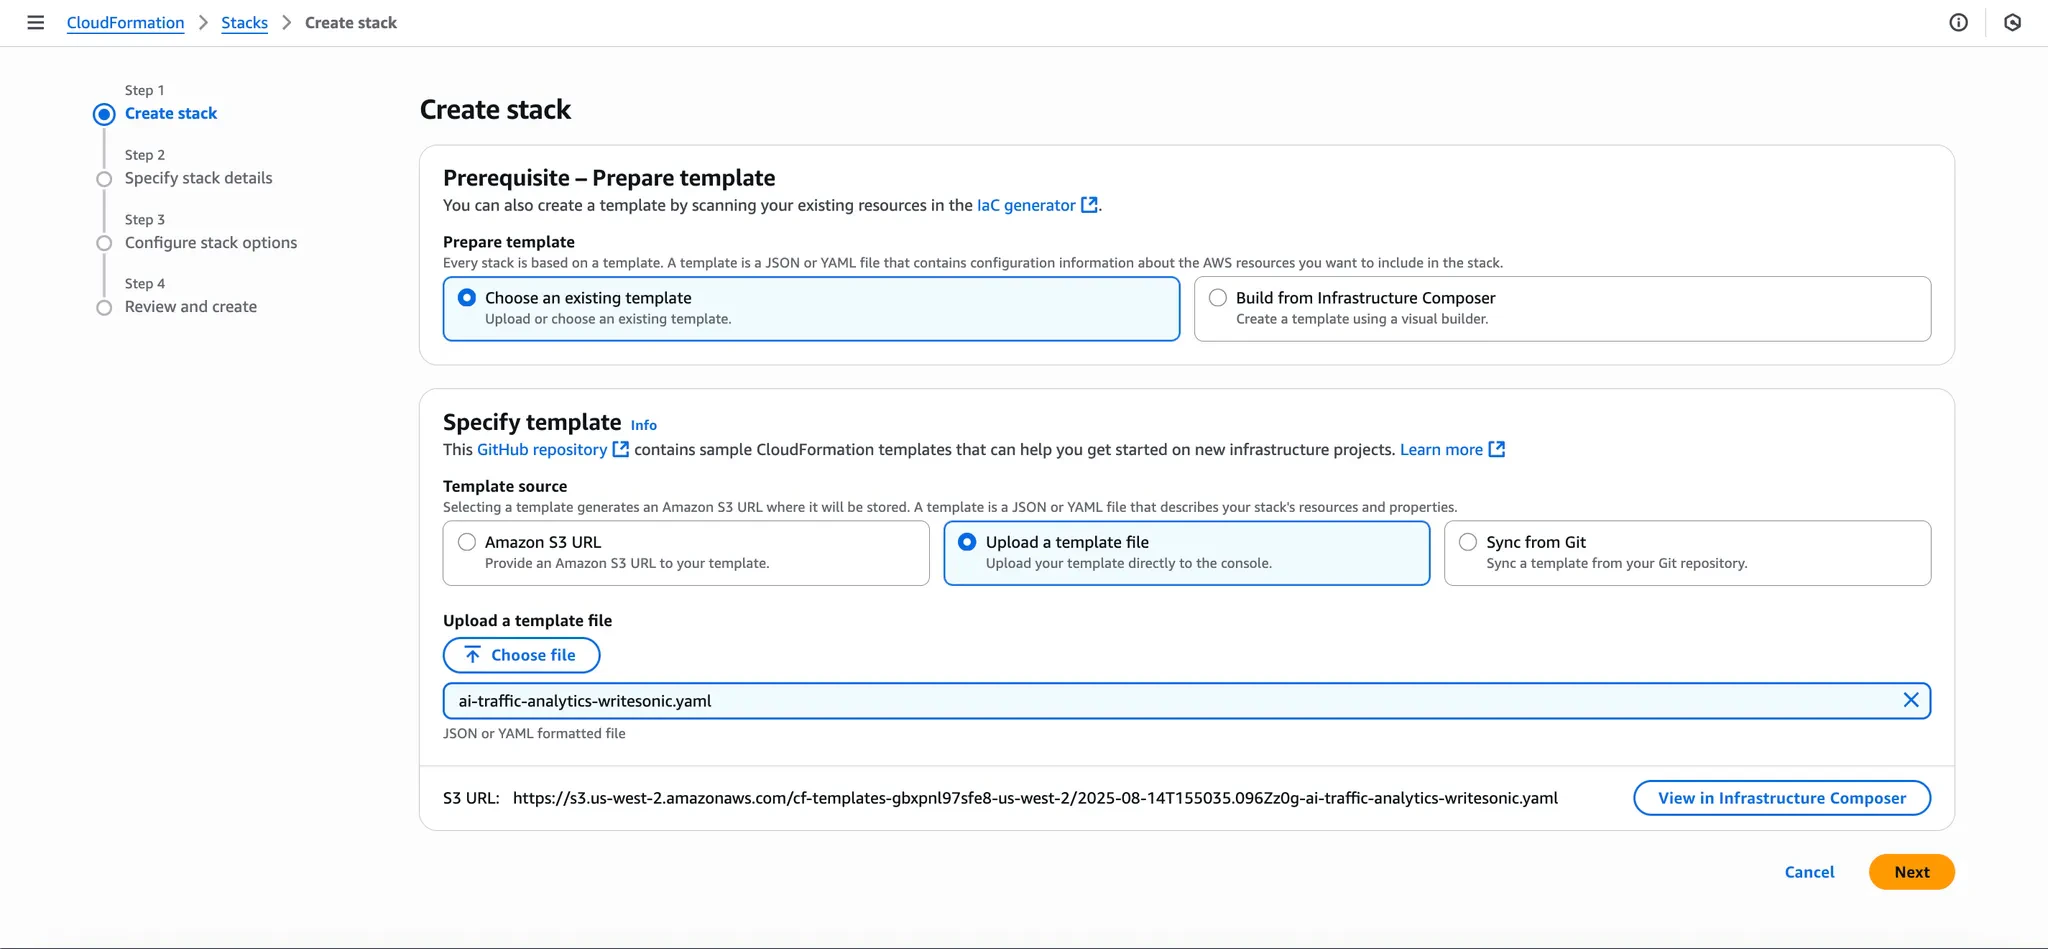
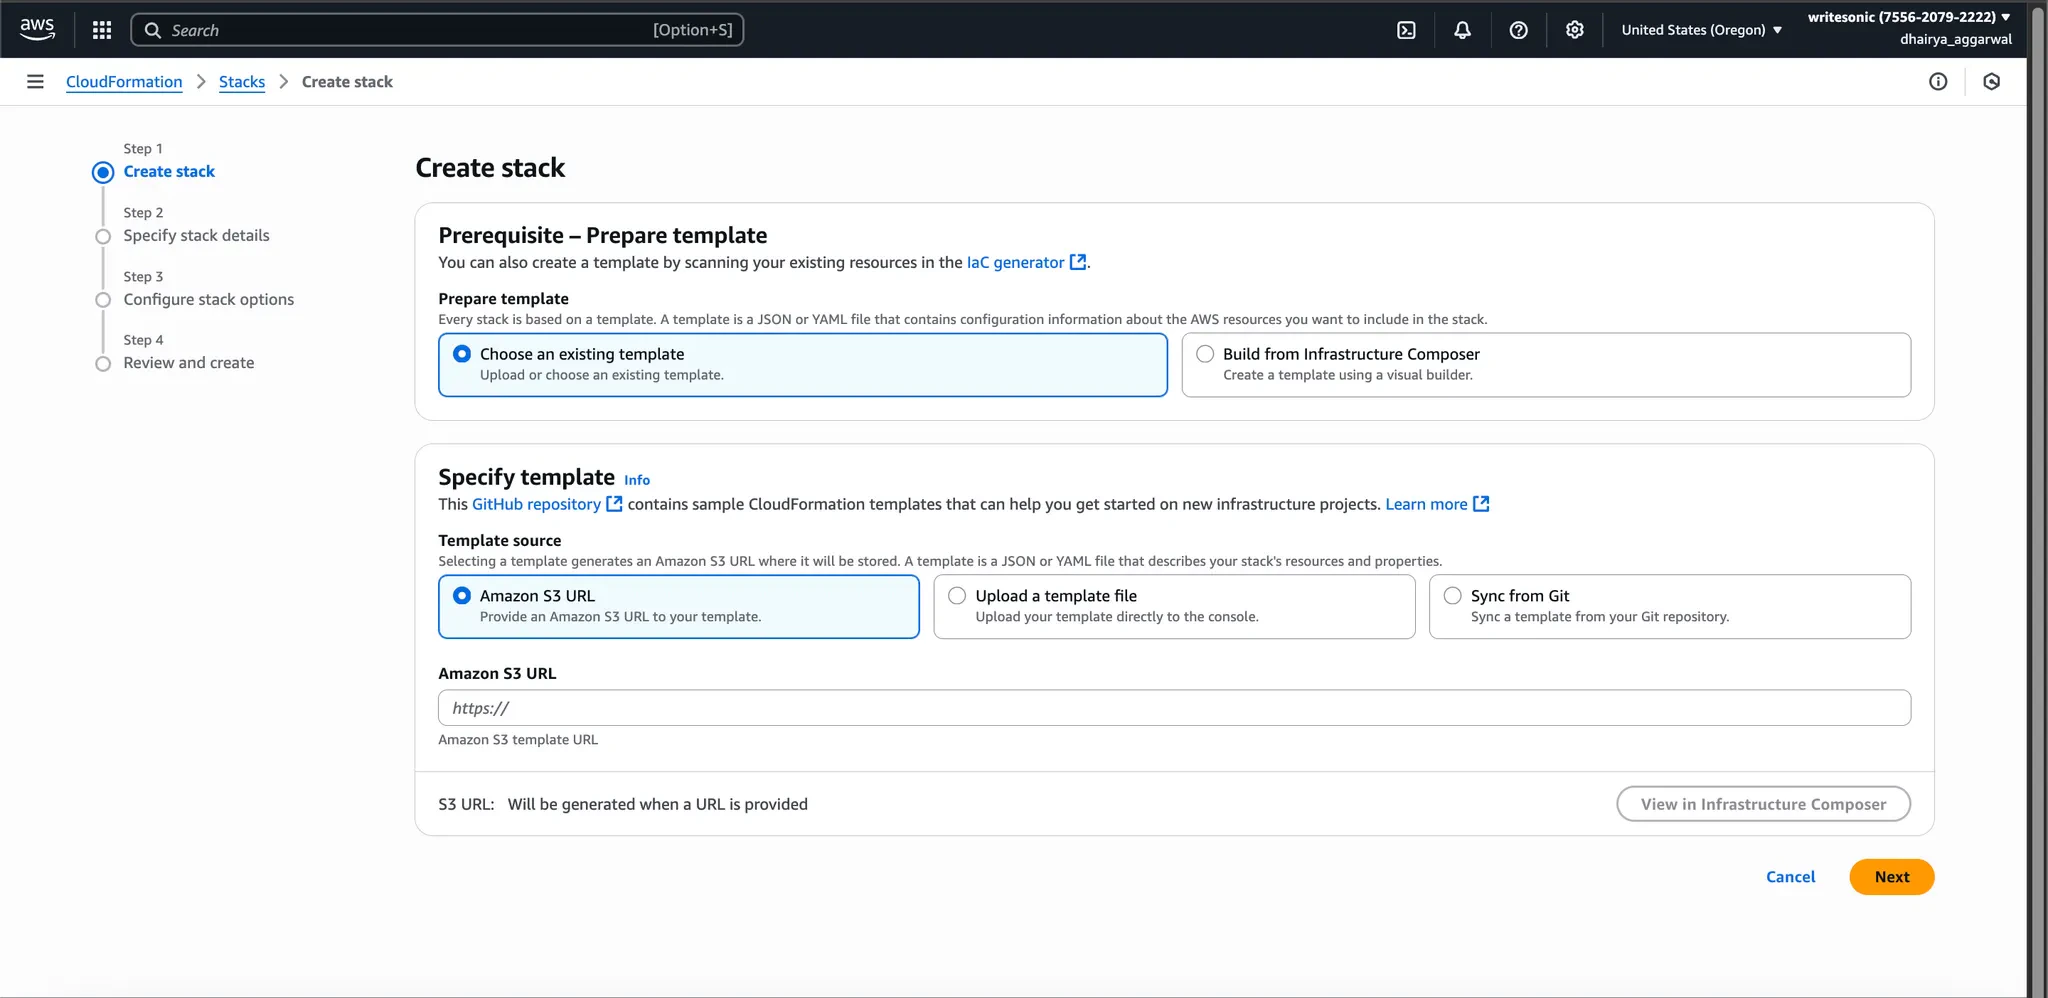 ### Step 2: Upload Template
1. On the "Create stack" page, select **"Upload a template file"**
2. Click **"Choose file"** and upload the CloudFormation template provided by Writesonic
3. Click **"Next"** to proceed
### Step 2: Upload Template
1. On the "Create stack" page, select **"Upload a template file"**
2. Click **"Choose file"** and upload the CloudFormation template provided by Writesonic
3. Click **"Next"** to proceed
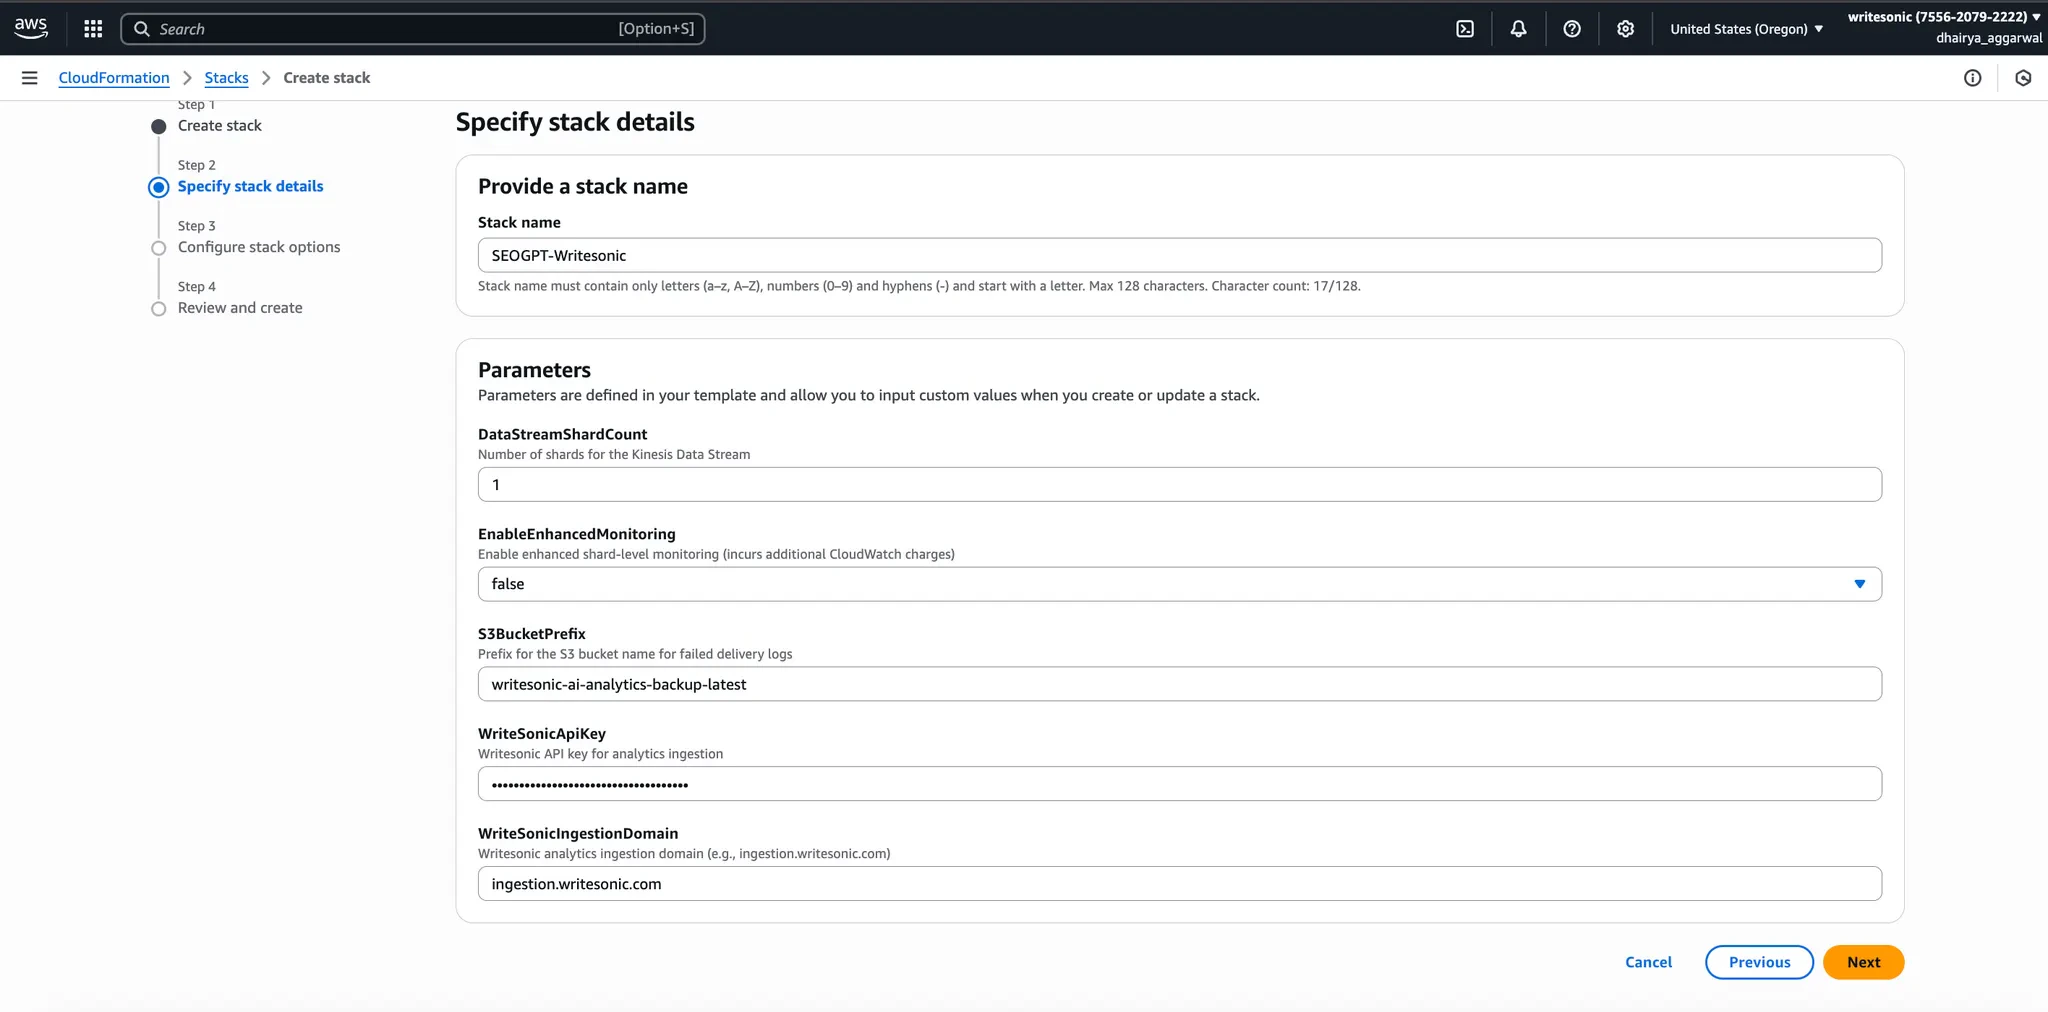
 ### Step 3: Configure Stack Details
1. Specify the following stack parameters:
| Parameter | Value | Description |
| ----------------------------- | -------------------------- | --------------------------------------------- |
| **DataStreamShardCount** | `1` | Number of shards for the Kinesis Data Stream |
| **EnableEnhancedMonitoring** | `False` | Enhanced monitoring setting |
| **S3BucketPrefix** | *Your desired bucket name* | Prefix for the S3 bucket that will store logs |
| **WritesonicAPIKey** | *Your API key* | API key provided by Writesonic |
| **WritesonicIngestionDomain** | `ingestion.writesonic.com` | Writesonic ingestion endpoint |
2. Click **"Next"** after entering all parameters.
### Step 3: Configure Stack Details
1. Specify the following stack parameters:
| Parameter | Value | Description |
| ----------------------------- | -------------------------- | --------------------------------------------- |
| **DataStreamShardCount** | `1` | Number of shards for the Kinesis Data Stream |
| **EnableEnhancedMonitoring** | `False` | Enhanced monitoring setting |
| **S3BucketPrefix** | *Your desired bucket name* | Prefix for the S3 bucket that will store logs |
| **WritesonicAPIKey** | *Your API key* | API key provided by Writesonic |
| **WritesonicIngestionDomain** | `ingestion.writesonic.com` | Writesonic ingestion endpoint |
2. Click **"Next"** after entering all parameters.
 ### Step 4: Configure Stack Options
1. Review the stack options (no additional configuration required)
2. Click **"Next"** to continue
### Step 4: Configure Stack Options
1. Review the stack options (no additional configuration required)
2. Click **"Next"** to continue
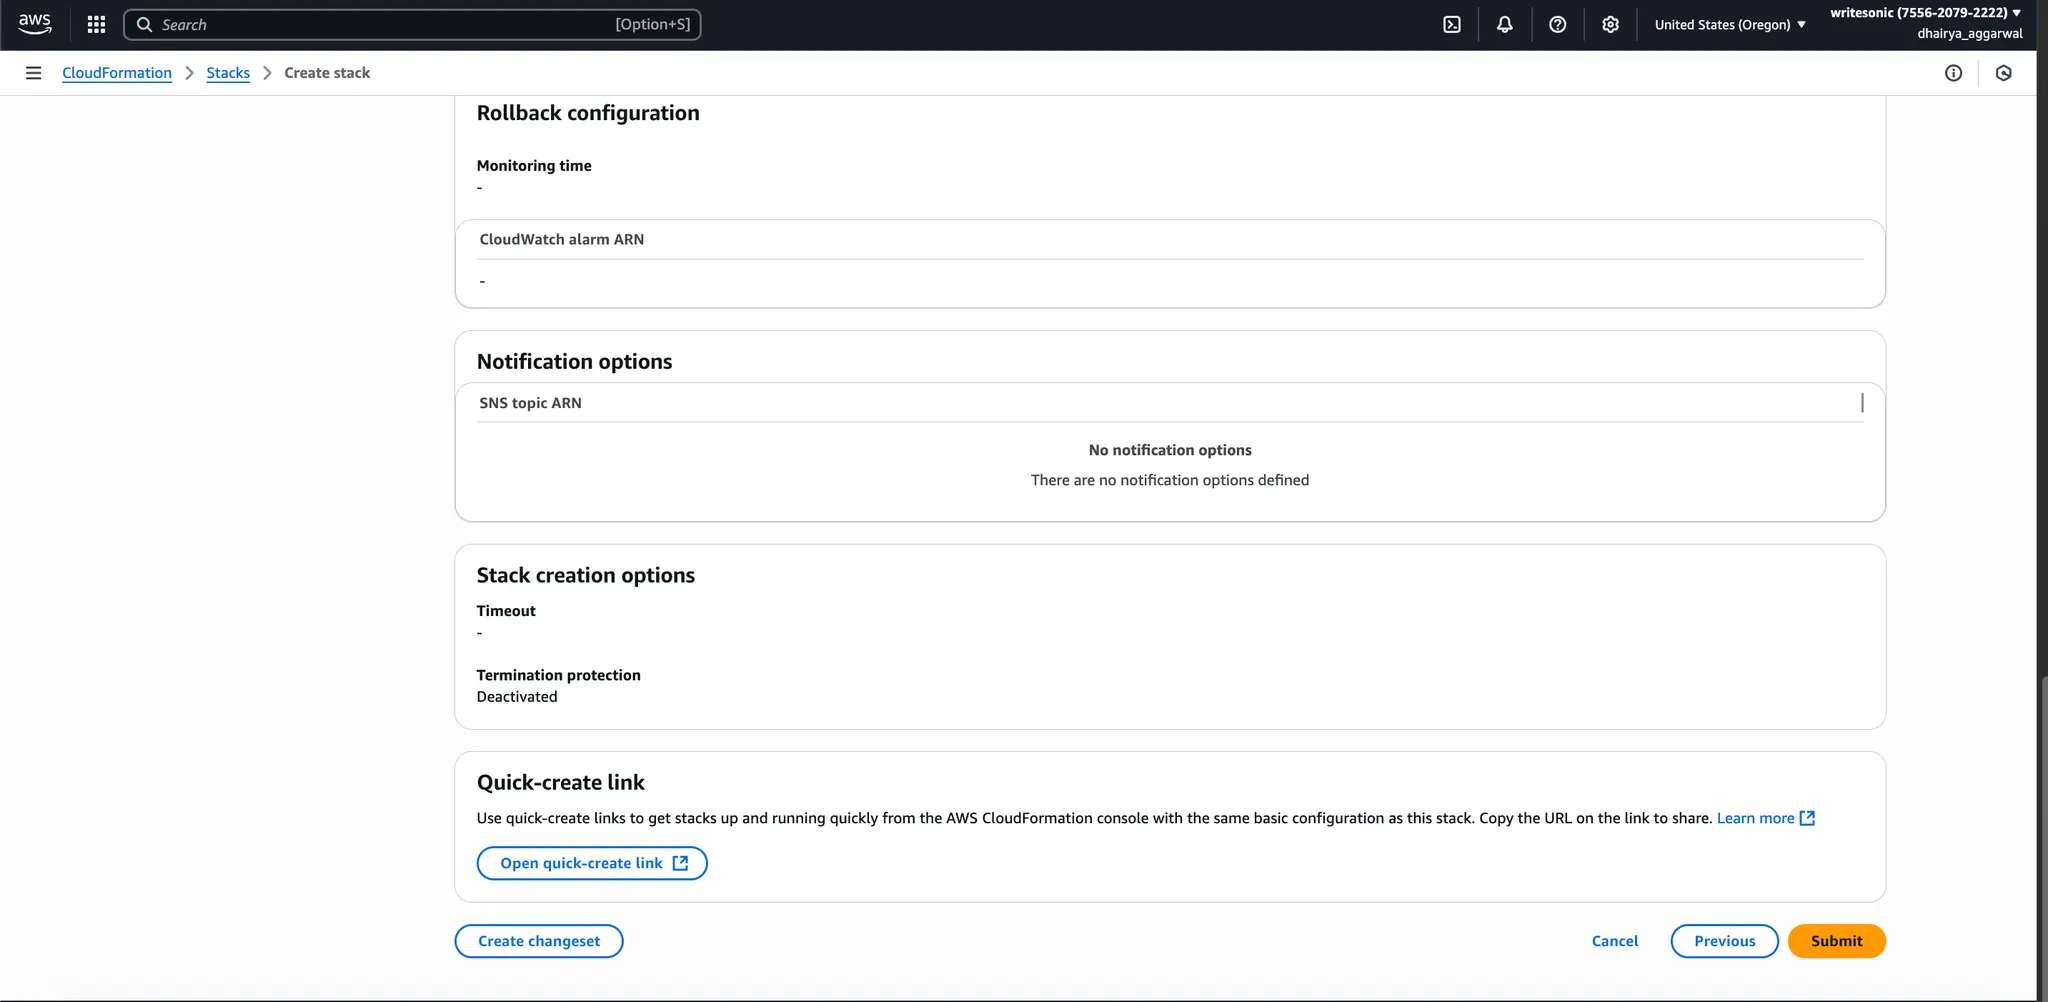
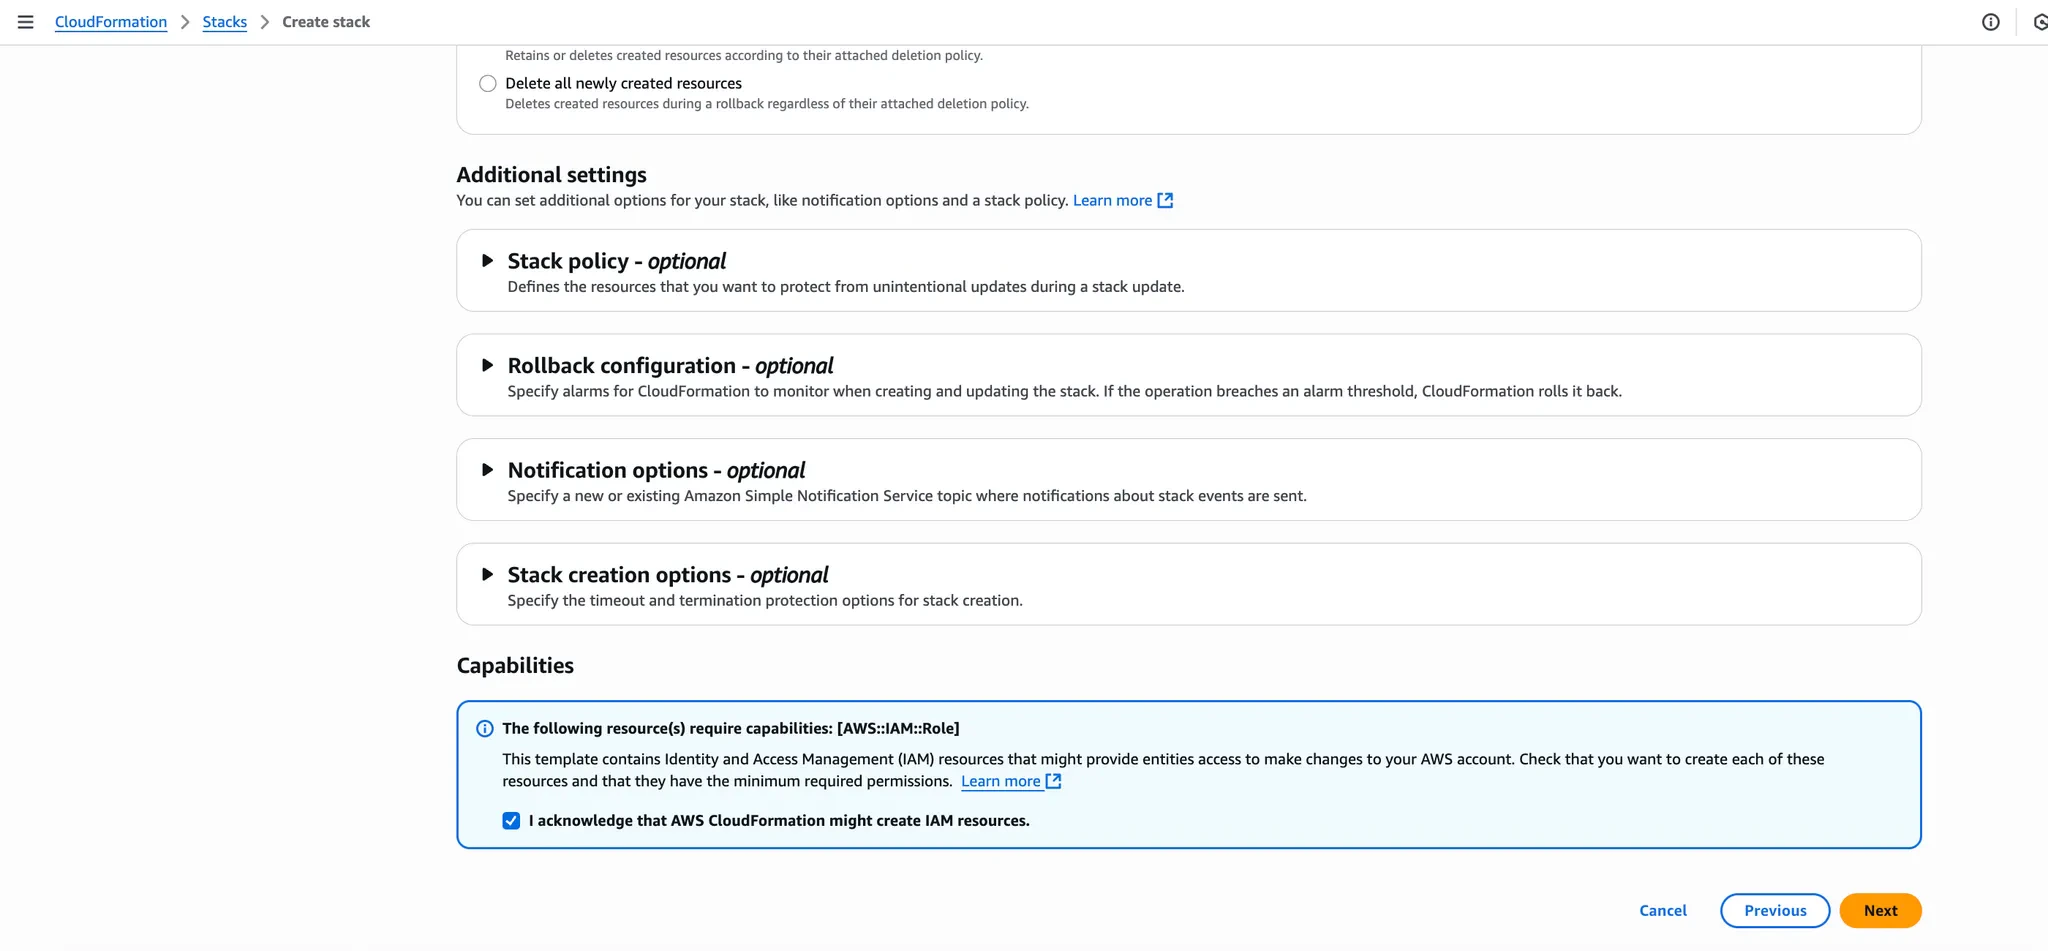 ### Step 5: Review and Create
1. Review all stack configuration details
2. Check the acknowledgment box confirming that CloudFormation might create IAM resources
3. Click **"Submit"** to create the stack
### Step 5: Review and Create
1. Review all stack configuration details
2. Check the acknowledgment box confirming that CloudFormation might create IAM resources
3. Click **"Submit"** to create the stack
 ### Step 6: Wait for Stack Creation
1. Monitor the stack creation progress in the CloudFormation console
2. Wait for the status to change to **"CREATE\_COMPLETE"**
3. This process typically takes several minutes
## Phase 3: Configure CloudFront Distribution Logging
### Step 1: Access CloudFront Distribution
1. Navigate to the CloudFront service in AWS Console
2. Locate and select the CloudFront distribution you want to monitor
3. Click on the **"Logging"** tab
### Step 6: Wait for Stack Creation
1. Monitor the stack creation progress in the CloudFormation console
2. Wait for the status to change to **"CREATE\_COMPLETE"**
3. This process typically takes several minutes
## Phase 3: Configure CloudFront Distribution Logging
### Step 1: Access CloudFront Distribution
1. Navigate to the CloudFront service in AWS Console
2. Locate and select the CloudFront distribution you want to monitor
3. Click on the **"Logging"** tab
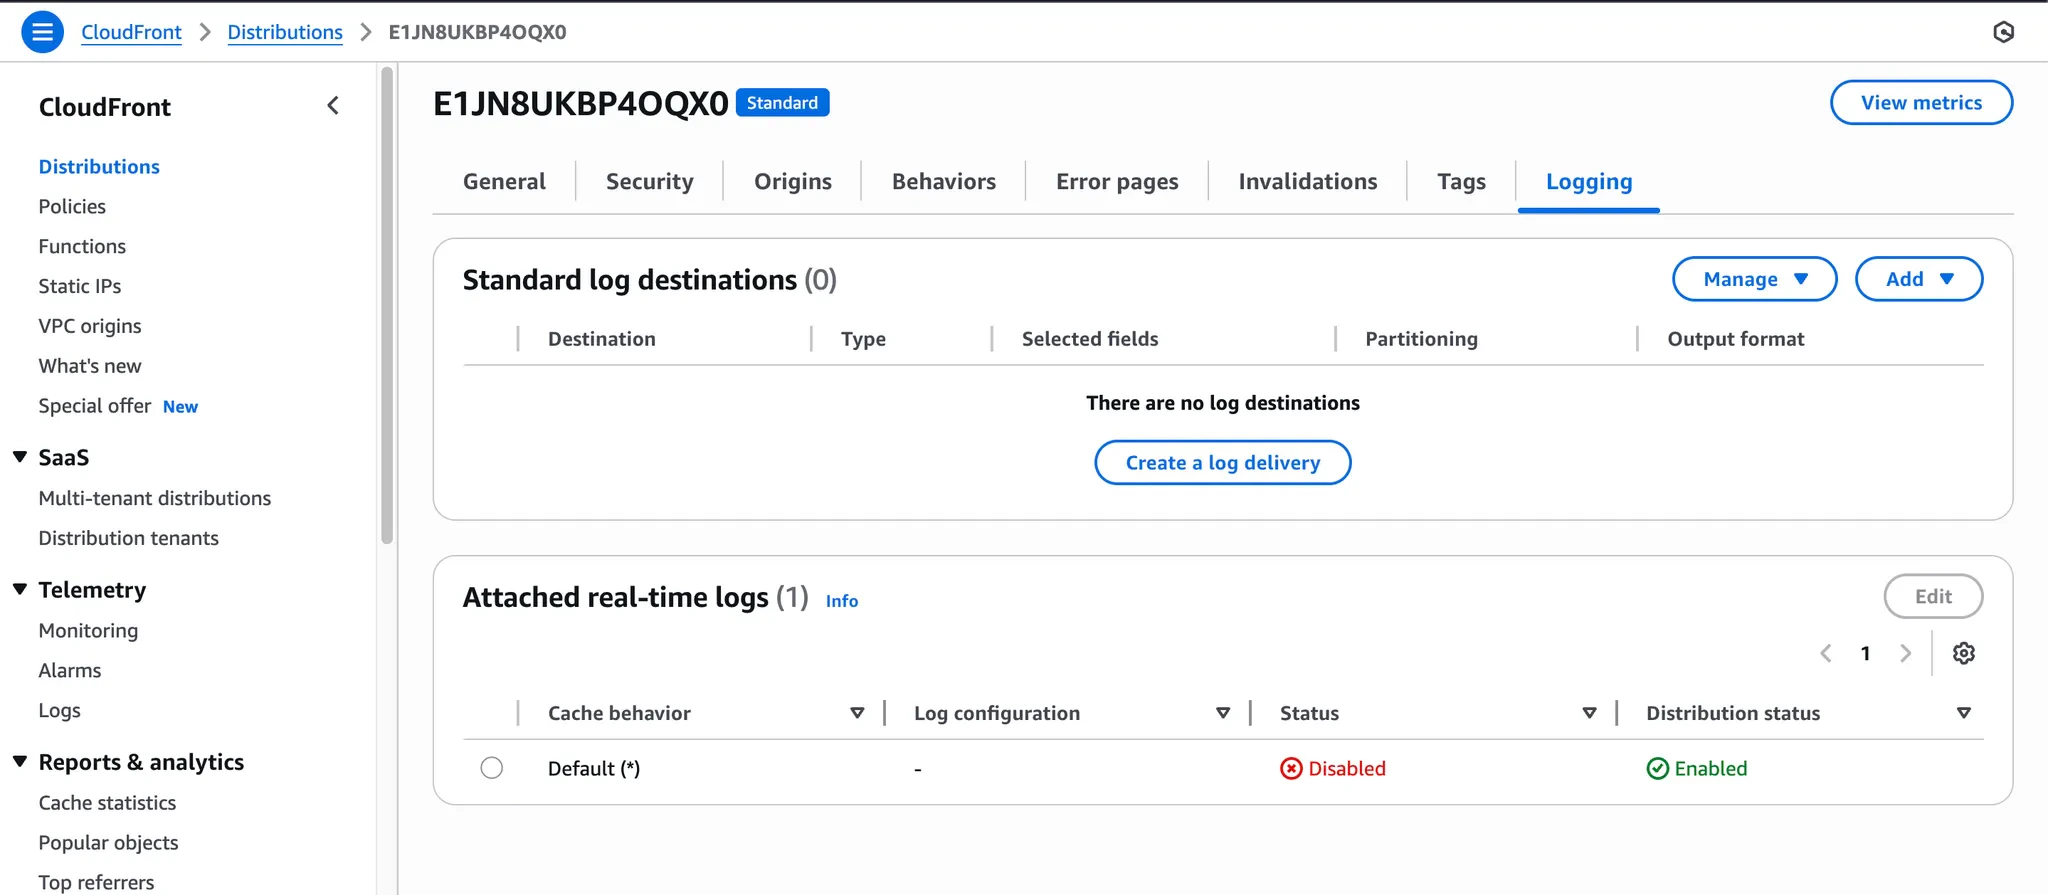 ### Step 2: Configure Real-time Logs
1. In the Logging tab, locate the **"Real-time logs"** section
2. Click on **"Edit""** to modify the configuration
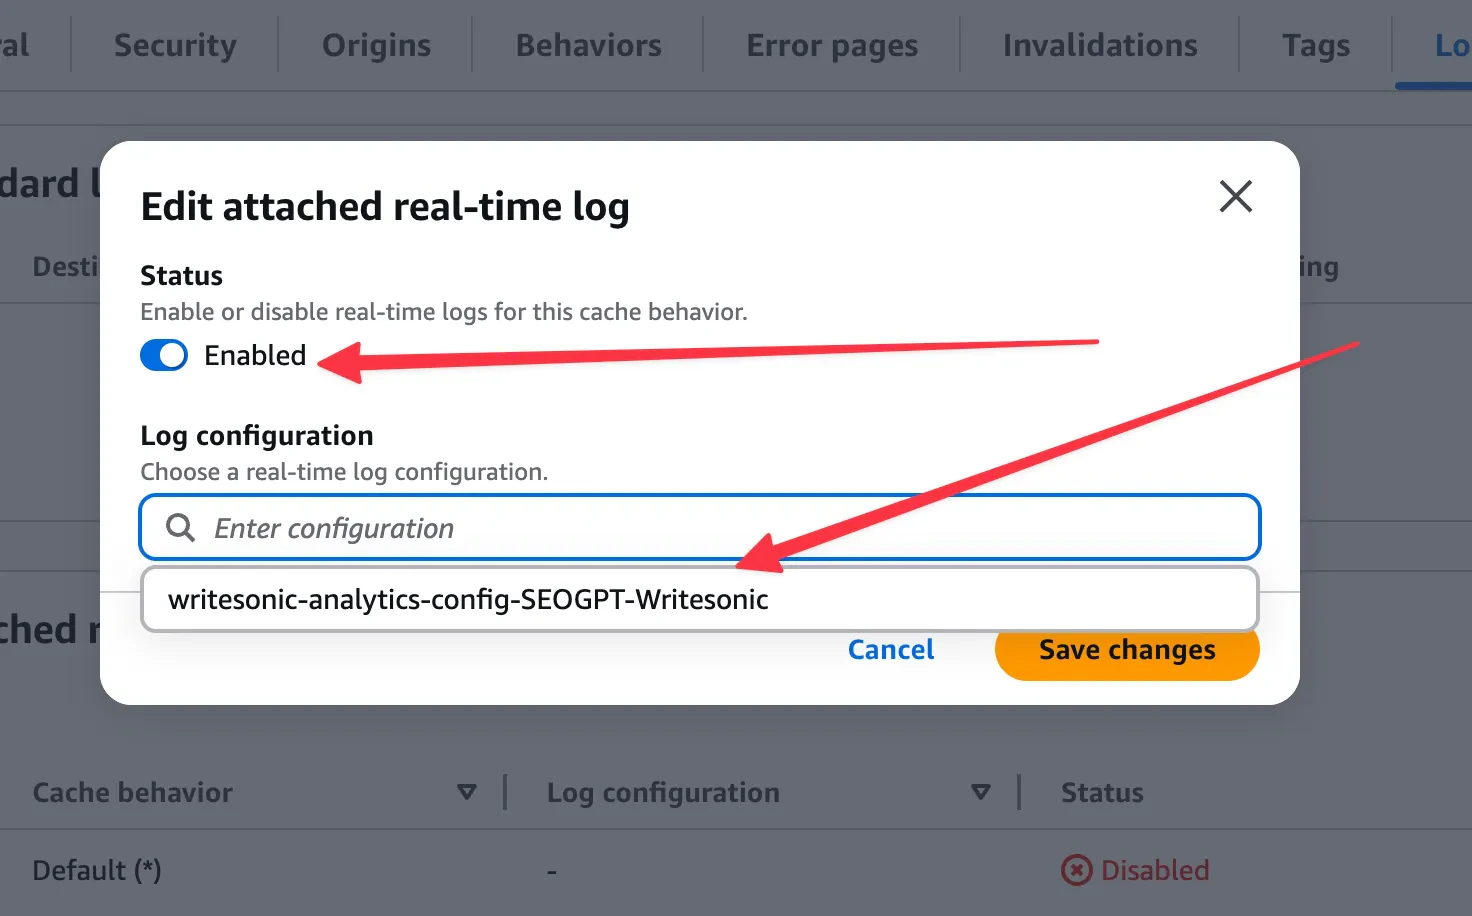
### Step 3: Enable Logging
1. Set the **Status** to **"Enabled"**
2. Select the **Log configuration** that was created by the CloudFormation stack
3. Click **"Save changes"** to apply the configuration
### Step 2: Configure Real-time Logs
1. In the Logging tab, locate the **"Real-time logs"** section
2. Click on **"Edit""** to modify the configuration
### Step 3: Enable Logging
1. Set the **Status** to **"Enabled"**
2. Select the **Log configuration** that was created by the CloudFormation stack
3. Click **"Save changes"** to apply the configuration
 ## Phase 4: Integration Verification
1. After completing all the steps, the CloudFormation stack should show as **"CREATE\_COMPLETE"**
2. Real-time logs should be **"Enabled"** on your CloudFront distribution
3. Return to **AI Bot Analytics** Page in Writesonic
4. Click on **"Verify Integration"** to confirm that your Cloudfront integration is working properly
5. Once verified, you'll be redirected to your analytics dashboard. The process typically finishes in 1–2 minutes but may take up to 5 minutes.
## Troubleshooting
If you encounter any issues during setup:
* **Stack Creation Fails**: Check that your AWS account has all required permissions listed in Prerequisites
* **CloudFormation Errors**: Verify that all parameters are entered correctly, especially the Writesonic API Key
* **Missing Log Configuration**: Ensure the CloudFormation stack shows "CREATE\_COMPLETE" before configuring CloudFront
* **CloudFront Not Logging**: Confirm that real-time logs are set to "Enabled" and the correct log configuration is selected
* **Missing Data**: Allow 5-10 minutes for data to begin flowing; check that your website is receiving traffic
* **API Key Issues**: Verify the Writesonic API Key is copied exactly as provided without extra spaces
For assistance, contact **[\[email protected\]](/cdn-cgi/l/email-protection#becdcbceced1cccafec9ccd7cadbcdd1d0d7dd90ddd1d3)**
## Important Notes
### Permissions
Ensure that your AWS account has necessary permissions for:
* Creating CloudFormation stacks
* Modifying CloudFront distributions
* Creating IAM roles and policies
* Creating S3 buckets and Kinesis streams
### Cost Considerations
Be aware of AWS costs associated with:
* Kinesis Data Streams (based on shard hours and PUT payload units)
* S3 storage for log data
* CloudFront real-time logs (per log line)
Monitor your AWS billing dashboard to track integration costs.
***
[Integrating with Custom Log Drain](/docs/integrating-with-custom-log-drain)
[Understanding Your Dashboard](/docs/ai-traffic-analytics-understanding-your-dashboard)
## Phase 4: Integration Verification
1. After completing all the steps, the CloudFormation stack should show as **"CREATE\_COMPLETE"**
2. Real-time logs should be **"Enabled"** on your CloudFront distribution
3. Return to **AI Bot Analytics** Page in Writesonic
4. Click on **"Verify Integration"** to confirm that your Cloudfront integration is working properly
5. Once verified, you'll be redirected to your analytics dashboard. The process typically finishes in 1–2 minutes but may take up to 5 minutes.
## Troubleshooting
If you encounter any issues during setup:
* **Stack Creation Fails**: Check that your AWS account has all required permissions listed in Prerequisites
* **CloudFormation Errors**: Verify that all parameters are entered correctly, especially the Writesonic API Key
* **Missing Log Configuration**: Ensure the CloudFormation stack shows "CREATE\_COMPLETE" before configuring CloudFront
* **CloudFront Not Logging**: Confirm that real-time logs are set to "Enabled" and the correct log configuration is selected
* **Missing Data**: Allow 5-10 minutes for data to begin flowing; check that your website is receiving traffic
* **API Key Issues**: Verify the Writesonic API Key is copied exactly as provided without extra spaces
For assistance, contact **[\[email protected\]](/cdn-cgi/l/email-protection#becdcbceced1cccafec9ccd7cadbcdd1d0d7dd90ddd1d3)**
## Important Notes
### Permissions
Ensure that your AWS account has necessary permissions for:
* Creating CloudFormation stacks
* Modifying CloudFront distributions
* Creating IAM roles and policies
* Creating S3 buckets and Kinesis streams
### Cost Considerations
Be aware of AWS costs associated with:
* Kinesis Data Streams (based on shard hours and PUT payload units)
* S3 storage for log data
* CloudFront real-time logs (per log line)
Monitor your AWS billing dashboard to track integration costs.
***
[Integrating with Custom Log Drain](/docs/integrating-with-custom-log-drain)
[Understanding Your Dashboard](/docs/ai-traffic-analytics-understanding-your-dashboard)